Grid Bot — User Manual
v3.0.0 · Electron Desktop Application · Windows · Node.js 18+
- 1. Introduction
- 2. System Requirements
- 3. Wallet Setup — The Two-Wallet System
- 4. The Interface — A Full Tour
- 5. Creating Your First Bot Instance
- 6. Configuration Reference — Every Field Explained
- 7. Starting the Bot — Startup Questions Explained
- 8. Terminals & Live Monitoring
- 9. Understanding Your Stats — ROI, APY
- 10. Profit Charts Window
- 11. The profit.txt File — Setting Up USD Calculations
- 12. How the Grid Trading Logic Works
- 13. Gas & The Backup Wallet System
- 14. Compounding & Profit Distribution
- 15. Instance Files — What Each File Does
- 16. Common Errors & Fixes
- 17. Safety Rules & Best Practices
- 18. Disclaimer
1. Introduction
Grid Bot is a Windows desktop application that automates grid trading on EVM-compatible blockchains. It runs entirely on your own machine — your private keys never leave your computer, and trades are executed directly on-chain via RPC.
The core strategy is simple: the bot divides a price range into evenly-spaced grid levels and places buy orders at lower levels and sell orders at higher ones. Every time the price crosses a grid boundary in the upward direction, it captures a small profit. Over time, in a ranging market, these small profits accumulate.
Each bot you create is a completely isolated instance with its own wallet, configuration, grid state, and logs. You can run multiple bots simultaneously, each trading a different pair or chain.
2. System Requirements
- OS: Windows 10 or Windows 11
- Node.js: v18 or higher — Download here
- Internet: Stable connection required at all times while the bot is running
- Wallets: At minimum two funded wallets — one for trading, one for gas and license
- License: A valid license tied to your Private Key 2 wallet address
⚠️ Node.js must be installed before launching the bot. If Node.js is not present on your system, the bot process will fail to start. Download and install it from nodejs.org then restart the app.
3. Wallet Setup — The Two-Wallet System
The bot uses two separate private keys and you must understand the role of each before creating any instance.
- This wallet does all the actual buying and selling on-chain.
- It must hold the Token A and Token B balances you want the bot to trade with.
- Use a unique, dedicated wallet for each bot instance trading on the same chain. Sharing a trading wallet across two bots on the same chain will cause conflicts.
- You may reuse the same Private Key Grid across bots on different chains, but a separate wallet per instance is always the safest approach.
- This wallet holds your license. The bot validates your license against this wallet's address every time it starts.
- This wallet also acts as the gas top-up source. When the trading wallet's gas balance drops below your configured threshold, the bot automatically transfers gas from this wallet to the trading wallet.
- The same Private Key 2 can be shared across all your bot instances — one license wallet serves all bots.
- Keep a healthy gas balance in this wallet at all times. If it runs dry, the auto top-up system fails and your trading wallet may stall.
⚠️ Never use your main personal wallet as either of these keys. Always use dedicated, purpose-built wallets with only the funds needed for operation.
4. The Interface — A Full Tour
Here is every section of the UI explained before you start creating bots.
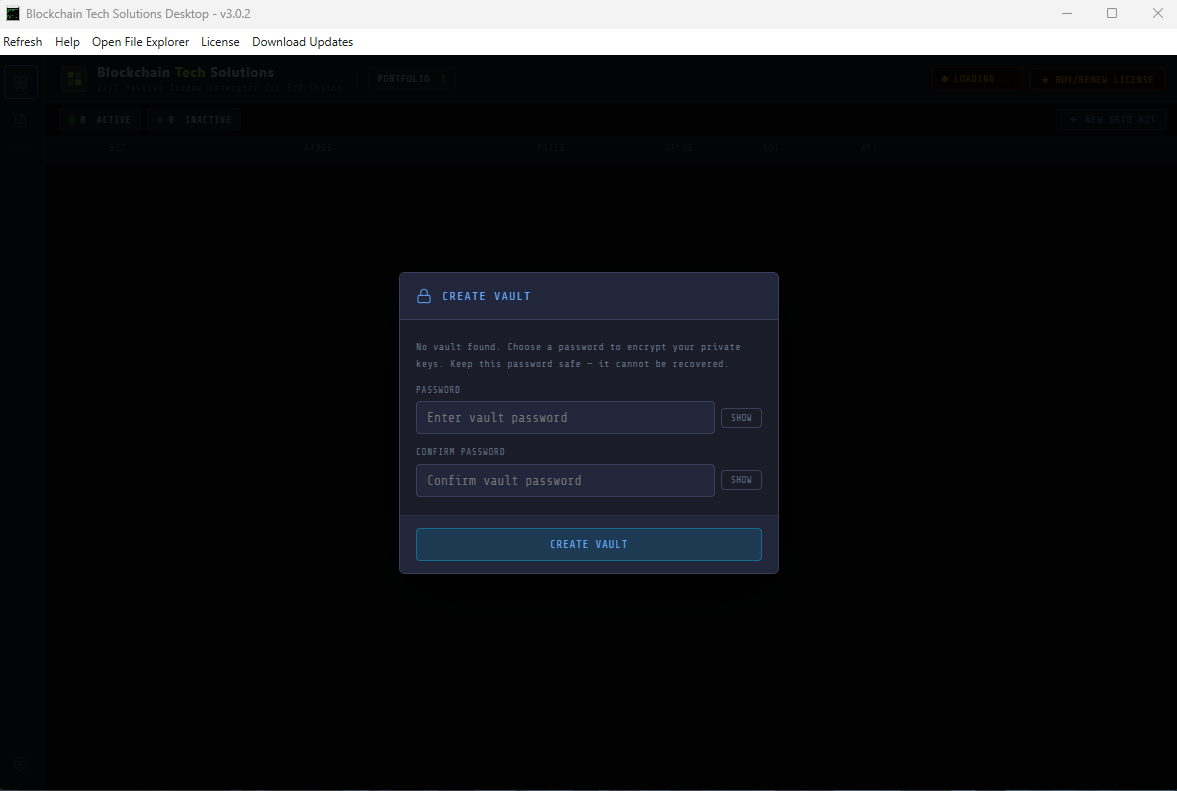
This is the first thing you will when you install the program.
You will need to create a password , this will allow the program to encrypt you private keys when creating a bot.
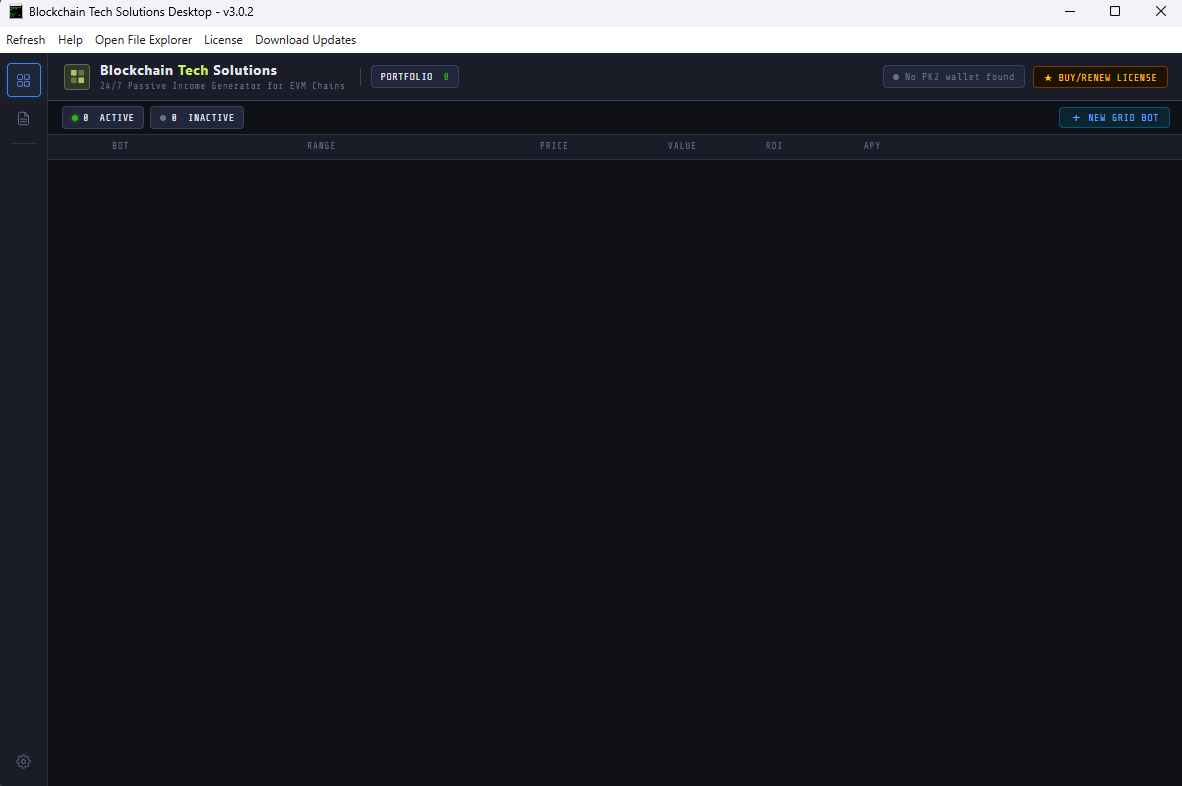
The main window is your control center. From here you can see every bot instance you have created, monitor their status at a glance, and see the total portfolio value of all funds currently deployed across all running bots.
Each bot appears as a card showing its name, token pair, trading range, current price, wallet info, and performance stats. The cards update live.
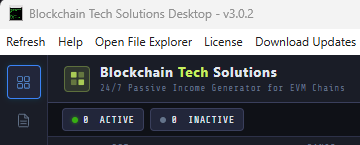
- Refresh button — reloads the entire UI without restarting any bots. Use this if the display looks stale.
- Help menu — opens the instruction manual, RPC list, known DEX routers, and gas token reference files.
- Active / Inactive filter — toggle between viewing only running bots, only stopped bots, or all of them.
- Open File Explorer — opens the folder location of the program user data.
- License button — opens the License UI in your browser so you can manage your subscription.
- Download Updates — opens the download site see new updates.
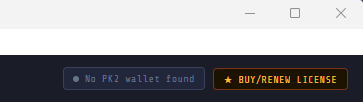
The license timer shows you how long your current license is valid. Next to it is a direct link button to the License UI. The theme the UI uses can be changed in the settings tab — the app ships in dark mode by default.
The license is checked every time a bot starts. If validation fails, the bot will print the error to the terminal and refuse to run. Make sure your Private Key 2 wallet is the same one registered to your license.
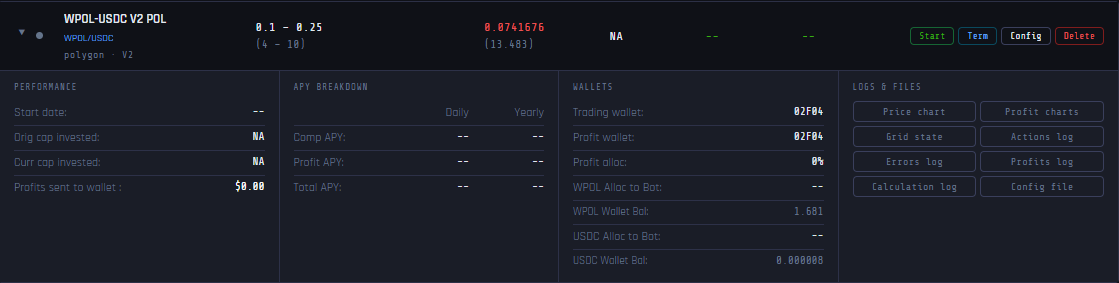
Each card on the main screen represents one bot instance and displays:
- Status dot — green = running, grey = stopped
- Token pair symbols — resolved live from the chain via ERC20 symbol()
- Trading range — your configured Low Price to High Price
- Current Price — fetched live on-chain directly from the LP reserves
- Trading Wallet — last 5 characters of the wallet address
- Profit Wallet — address and percentage split if configured
- Start date/time — when the bot was last started
- Original Capital Invested — USD value of funds when the bot started
- Current Capital Invested — USD value of funds when the bot started plus USD value of funds added
- Current Value — current value of funds
- Lifetime ROI — total profits sent to the profit wallet as a percentage of Current Capital Invested
- Performance APY — time-normalized annualized return based on actual runtime and total ROI
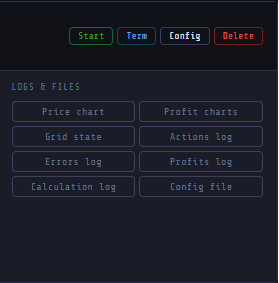
Each bot card has an options tab giving you access to:
- Start — opens the termianl to actually start this bot.
- Terminal — opens the live terminal window for this bot
- Config Settings — opens the configuration panel to edit this bot's settings
- Dexscreener Chart — opens the trading pair's chart in your browser using the Chain ID you configured
- Profit Charts — opens the live tracking window to see profits break down in USD
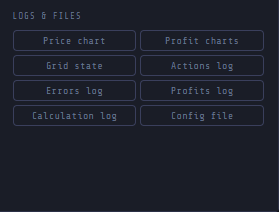
The second tab on each bot card gives you direct access to all the files the bot writes:
- Dexscreener Chart — opens the trading pair's chart in your browser using the Chain ID you configured
- Profit Charts — opens the live tracking window to see profits break down in USD
- Grid State — the full saved state of all grid levels and balances
- Actions Log — every trade, profit distribution, compound event, and bot start/stop
- Errors Log — any errors encountered during trading
- Profits Log — the profit.txt file that drives USD ROI & APY calculations (see Section 11)
- Configuration File — the raw config.json for this instance
- Calculations Log — same as actions log but presented differently for easy UI calculations.
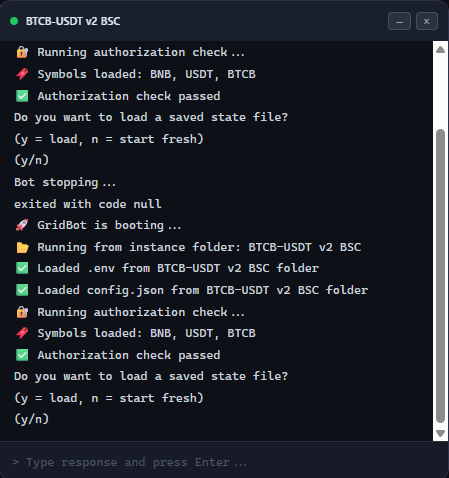
The terminal shows everything the bot prints in real time. The status dot at the top is green when running,
grey when stopped. The input field at the bottom is where you answer startup questions — type your response
and press Enter. It can be
minimized with – or closed with ×. Log history is buffered so opening a pop-out on
an already-running bot will show you recent history immediately.
5. Creating Your First Bot Instance
Click the New Bot button to open the instance creation panel.
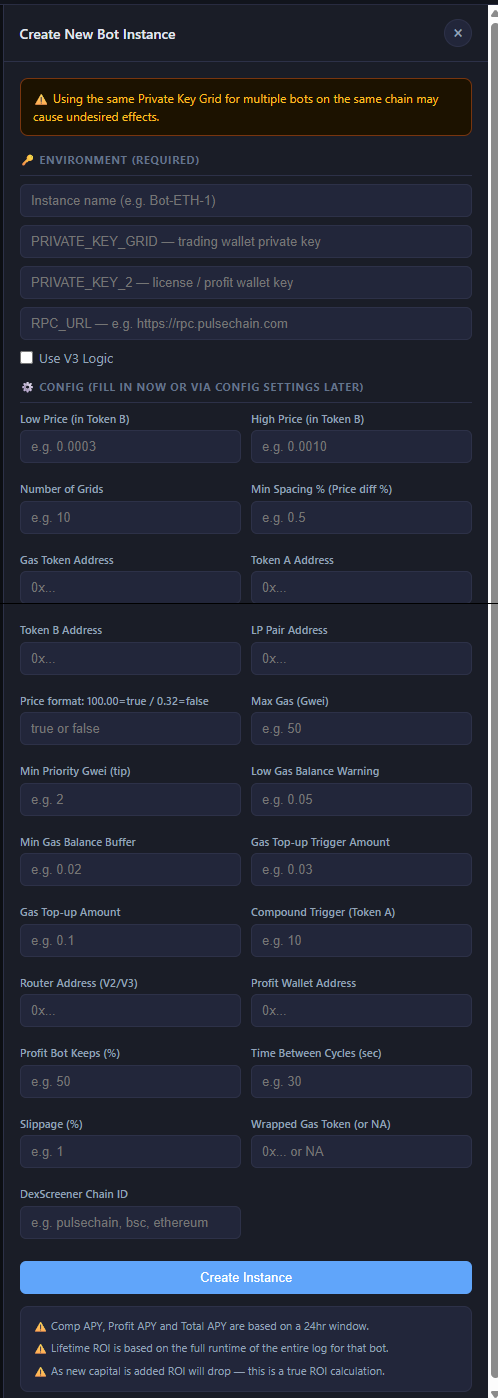
Instance Name
Give the bot a meaningful name using letters, numbers, spaces, dashes, periods, and underscores. Including
the token pair, chain, and version makes it easy to identify. Example: WBTC-USDC v3 BSC
Private Key Grid
The private key of the wallet that will execute trades. This wallet must already hold the Token A and Token B balances you intend to trade with.
Private Key 2
Your license and gas backup wallet. The same key is reused across all your bot instances.
RPC URL
The RPC endpoint for the chain you want to trade on. A list of known public RPCs is in the Help tab. Private or paid RPCs (Alchemy, QuickNode, etc.) are more reliable for active trading.
Use V3 Logic
Toggle ON if your LP pair is a Uniswap V3-style pool. Leave OFF for V2. This changes the entire internal trading logic — getting it wrong will cause failed transactions.
Full Config Settings
You can fill in configuration fields here or do it afterward via the Config Settings panel. See Section 6 for a full explanation of every field.
⚠️ Double-check your V2/V3 toggle before creating the instance. If the pair is V3 and the toggle is off, the bot will use V2 router calls which will fail immediately. If the pair is V2 and the toggle is on, the bot will attempt V3 slot0 price reads which will also fail.
Once you click Create Instance, the bot creates the instance folder with a blank config.json, a .env file with your keys and RPC, a grid_state.json, and a profit.txt. The new bot card appears in the main window immediately.
6. Configuration Reference — Every Field Explained
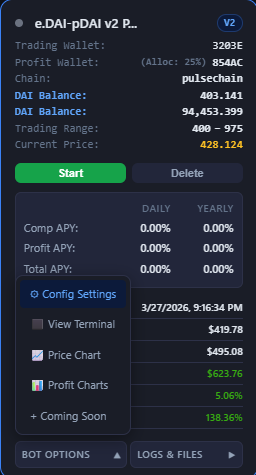
Reach the config panel at any time via the bot card's Bot Options tab → Config Settings. Configuration cannot be saved while the bot is running — stop it first.
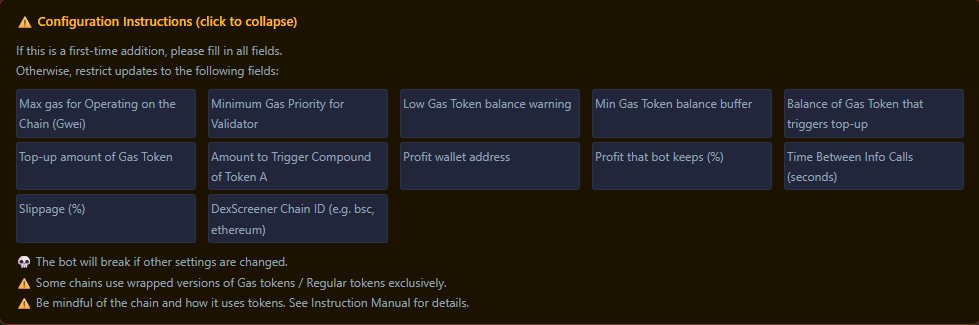
The instructions panel below the config fields shows which fields are safe to update between runs and which require a full fresh start. Always read this before editing a bot that has already been trading.
- The bottom of your trading range. The bot will not place buy orders below this price.
- "Price" means the ratio of Token B per Token A — not a dollar amount, unless Token B is a stablecoin.
- Using a stablecoin as Token B (USDC, USDT, DAI) makes this behave like a normal dollar price and is strongly recommended for beginners.
- If the current market price is below this value when you start, the bot will have no active grids until price enters your range.
- For decimal prices, always include the leading zero:
0.0045not.0045.
- The top of your trading range. The bot will not place sell orders above this price.
- Together with Low Price this defines the band the bot operates in. Make it wide enough to capture normal price movement, but not so wide that grids are too far apart to trigger regularly.
- Example: Low
60000, High70000→ bot only trades WBTC between $60K–$70K.
- How many grid levels you want across your range. Treated as a suggestion — the bot calculates spacing and may adjust slightly.
- More grids = smaller profit per trade but more frequent trades. Fewer grids = larger profit per trade but less frequent.
- The bot shows you the calculated options and asks you to confirm before committing on first run.
- The minimum percentage price movement between two adjacent grid levels that you actually want enforced.
- Acts as a floor override — if the spacing calculated from your grid count is smaller than this, the bot offers to use this value instead.
- On first run the bot presents both options and lets you choose. Larger spacing = more profit per trade but fewer trades.
- The contract address of the native gas token for the chain you are trading on.
- On most chains (Ethereum, Polygon, Base, Arbitrum) this should be
null. - On BSC and PulseChain, you can use the Wrapped Gas token address here.
- The full list is in the Help tab under Known Gas Tokens (TXT).
⚠️ Setting this field incorrectly can cause all gas calculations to fail. Copy the address exactly as shown in the Known Gas Tokens file — do not type it manually.
- The contract address of the first token in your trading pair — the one you are accumulating.
- Example: for WBTC-USDC, Token A is WBTC.
- On V3, do not use the raw native gas token address. Use the wrapped version (WETH instead of ETH).
- Always copy/paste this address — never type it manually.
- The contract address of the second token — typically the stable or quote token.
- Example: for WBTC-USDC, Token B is USDC.
- The bot always calculates price as Token B per Token A, regardless of how Dexscreener displays the pair.
- Using a stablecoin as Token B makes price configuration and USD calculations much simpler.
Finding token addresses: Search the token name on the DEX you want to use and copy from the token selector, or search on the chain's block explorer (bscscan.com, etherscan.io, polygonscan.com) and copy from the contract page. Always verify against a trusted source.
- The contract address of the specific liquidity pool the bot will read prices from and route trades through.
- Must match your Token A, Token B, router version (V2/V3), and chain exactly.
- Best way to find it: paste your token address into Dexscreener and find the pair matching the DEX and version you want.
- Set to
trueif Token A's price in Token B is a large number (e.g. WBTC priced in USDC = ~65000). - Set to
falseif the price is a small decimal (e.g. a low-cap token = ~0.0048). - This affects how the bot rounds and formats price comparisons internally. Getting it wrong causes grid level mismatch issues.
- The hard ceiling on gas price the bot will pay per transaction. If network gas exceeds this, the bot skips the trade rather than overpay.
- Too low and the bot stops trading during gas spikes. Too high and you risk paying excessive fees.
Recommended: Check current Gwei on your wallet or block explorer. Stable chains: add 10% —
e.g. 0.1 → set 0.11. Volatile chains: double or triple it — e.g.
0.025 → set 0.05 to 0.075.
- The priority fee added on top of base gas to get transactions included faster.
- Safe starting point: half the current chain Gwei. On Polygon, use a minimum of 25 Gwei.
- Higher = faster but costs more. Lower = saves fees but transactions may be slower.
- The minimum gas balance the trading wallet must maintain. If gas drops below this, the bot pauses trading and waits for a top-up from the Backup Wallet.
- Set this to cover several transactions worth of gas so the bot has a real buffer.
- A small additional buffer above the Low Gas Warning to handle edge cases where gas spikes between the warning check and the top-up arriving.
- Can be small — just enough to cover 1–2 extra transactions.
- When the trading wallet's gas drops to this level, the bot automatically requests a transfer from the Backup Wallet.
- Recommended: set to roughly half your Low Gas Token Balance Warning. This gives the bot time to receive the top-up before hitting the hard floor.
- How much gas the bot requests from the Backup Wallet on each top-up event.
- Recommended: set this equal to your Low Gas Token Balance value so the wallet refills to a healthy level each time.
- The Backup Wallet must have this amount available or the top-up will fail silently.
- As the bot profits, it accumulates unallocated Token A. Once this reaches the amount you set here, the bot automatically redistributes it back into the active grids.
- Compounding grows your position size over time, increasing the value of each grid level and therefore profit per trade.
- Lower values compound more often in smaller amounts. Higher values compound less often but add more at once.
- The contract address of the DEX router the bot sends swap transactions to.
- Must match the version (V2 or V3) and the chain you are trading on.
- A reference list is in the Help tab under Known Dex Routers (TXT).
- Using the wrong router address is one of the most common setup mistakes — verify carefully.
- When the bot distributes profits (the "sent" portion), they go to this wallet.
- Can be any wallet — your main personal wallet, a cold wallet, or a separate savings address.
- Triple-check this address. Sending to the wrong address is permanent and unrecoverable.
- When a profit distribution occurs, this is the percentage the bot retains for compounding back into the grids.
- Enter as a whole number. Example:
50= bot keeps 50%, sends 50% to Profit Wallet. 100= all profit stays in the bot for compounding.0= all profit sent to your wallet immediately.
- How often the bot's trading loop polls the chain for current price, balances, and grid status.
- Lower = more responsive but more RPC calls. Higher = less responsive but lighter on network load.
- 10–30 seconds is typical for most pairs. Adjust based on pair volatility and RPC capacity.
- For V2 pairs: the maximum price deviation you will accept on a swap. If execution slips more than this, the transaction reverts.
- For V3 pairs: each pool has its own fee tier built-in. You can set slippage to
0for V3. - V2 recommendation: 0.5–1% for stable pairs, 1–3% for volatile or low-liquidity pairs.
- The wrapped version of the chain's native gas token (WETH on Ethereum, WBNB on BSC, WPLS on PulseChain).
- Required for V3 on all chains.
- For V2 on chains where raw gas cannot be used in smart contracts (Ethereum, Polygon, Base, Arbitrum): enter the wrapped address.
- For V2 on chains that support raw gas in swaps (BSC, PulseChain): enter
NAin capitals.
- A short string used to build the Dexscreener chart URL. Examples:
bsc,ethereum,polygon,pulsechain. - When you click the Dexscreener button on a bot card, the app opens
dexscreener.com/{chainId}/{pairAddress}in your browser. - Valid chain IDs are listed in the Known Gas Tokens file in the Help tab.
7. Starting the Bot — Startup Questions Explained
When you click Start, the bot runs a license check, loads your config and .env, then enters an interactive startup sequence in the terminal. You must respond to each prompt to proceed.
⚠️ The input field at the bottom of the terminal is how you answer startup questions. Click into it, type your response, and press Enter. If the terminal appears unresponsive, click off the app window and back on it to restore focus.
Loading a Previously Running Bot
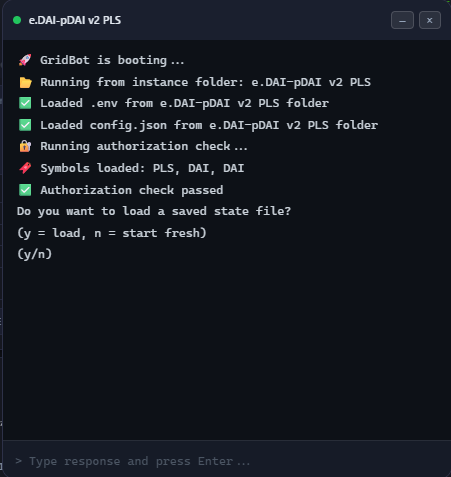
Question 1 — Load saved grid state?
If this bot has run before, it asks whether to load the saved grid_state.json. Answer
y to resume exactly where the bot left off — all grid positions, balances, and levels are
restored from disk. Answer n to wipe the old state and start completely fresh. For a routine
restart, always answer y.
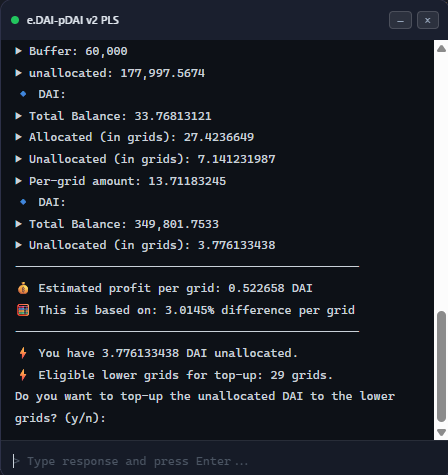
Status check and unallocated funds
After loading saved state, the bot checks the current live price, all grid levels, and current wallet
balances. If it detects Token A sitting unallocated in lower grids from a previous missed trade, it asks if
you want to add those funds to the grid now. Answer y to include them or n to
skip.
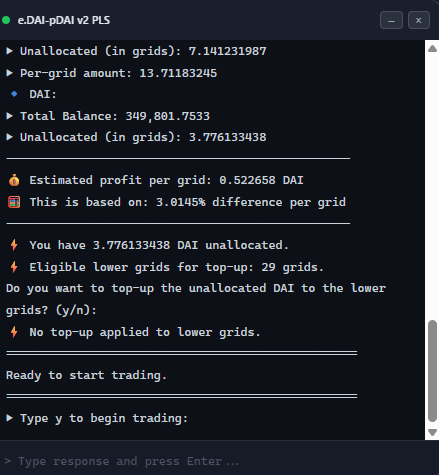
Final confirmation — begin trading?
After the full status review, the bot asks for a final y to enter the live trading loop. Once
you confirm, the bot starts executing trades based on market conditions.
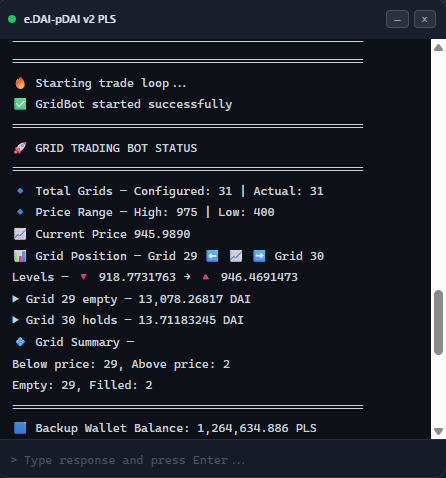
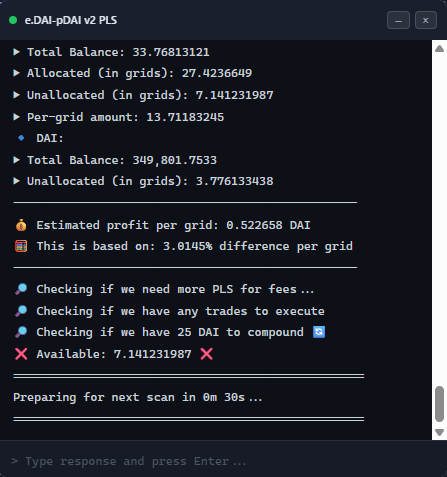
Once running, the terminal shows the live loop — current price, grid statuses, balance readings, and any trade that executes.
Starting a Brand New Bot (Fresh Start)
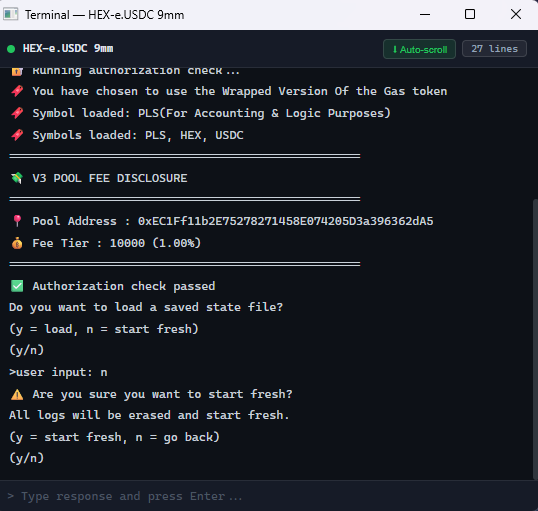
Answer n to start fresh
If this is the first time running this bot, or you want to completely reset, answer n at the
prompt. It will ask again to make sure you dont override save files unless you are sure , type
y. The bot begins the first-run setup sequence.
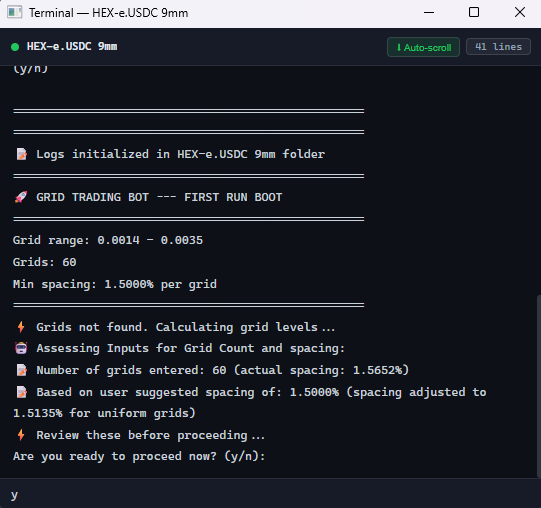
Grid calculation
The bot reads your configuration, fetches the current live price from the chain, and calculates all grid levels based on your Low Price, High Price, Number of Grids, and Min Spacing settings. It creates the Actions Log file at this point.
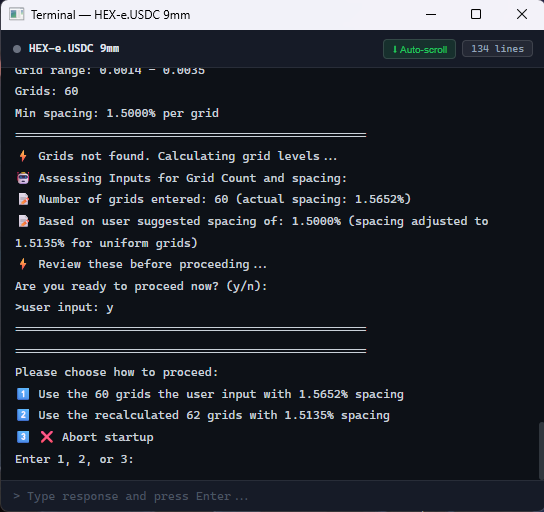
Choose your grid option
The bot presents two options — one using your exact grid count, one using your minimum spacing percentage — and recommends which to pick based on your settings. Enter the corresponding number and press Enter. A third option lets you abort and adjust your configuration if neither looks right.
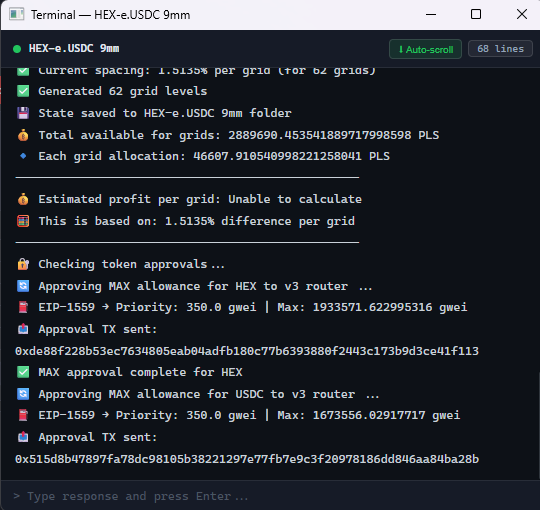
Saving grid state and token approvals
Once you confirm the grid option, the bot saves the full state to grid_state.json and submits
ERC20 token approval transactions for Token A and Token B. These approvals let the router contract move your
tokens when trades execute.
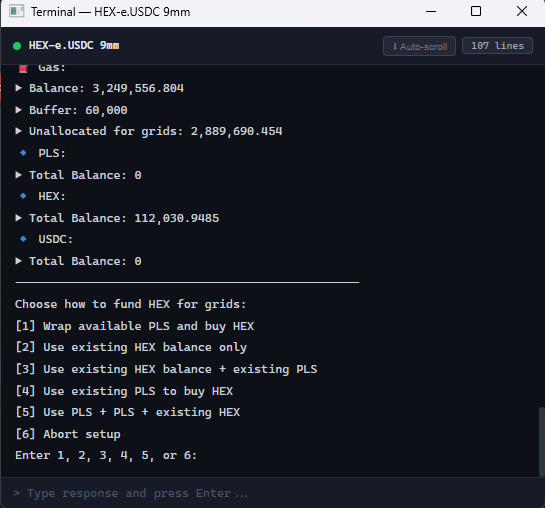
Funding the grid — Token A allocation
The bot asks how you want to fund Token A across the grid. Options are dynamically generated based on your current wallet balance and grid structure. Choose the option matching how much you want the bot to manage and press Enter.
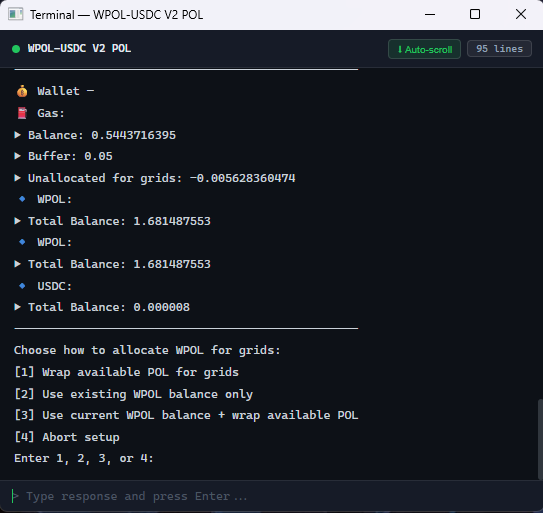
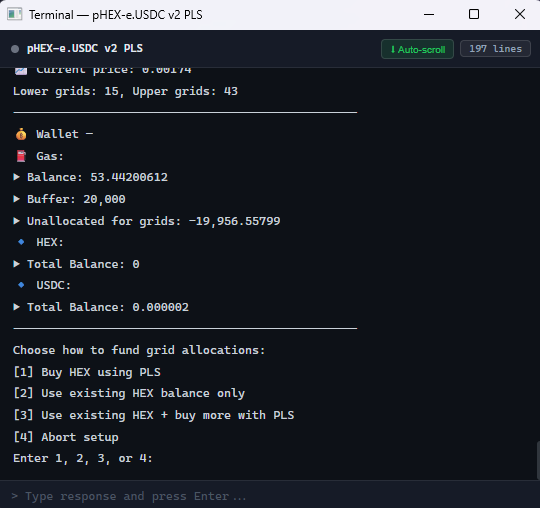
Additional questions may appear depending on V2 or V3 logic and which tokens are involved. Answer each one and press Enter.
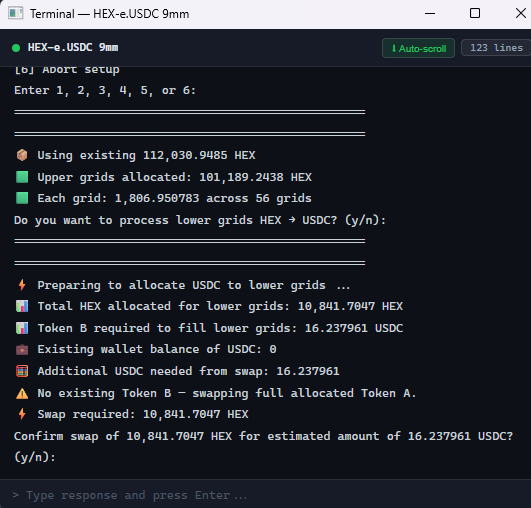
Lower grid fill question
If lower grids need filling with Token B, the bot asks permission to swap Token A into Token B for this
purpose, answer y to proceed or n abort. At this point it will calculate the
amount of Token A to use to fill lower grids. It will then check how much Token B is in the wallet — it
always check before doing swaps of
fresh capital to ensure equal value
at every grid level. Answer y to allow or n to exit and adjust balances on your
own.
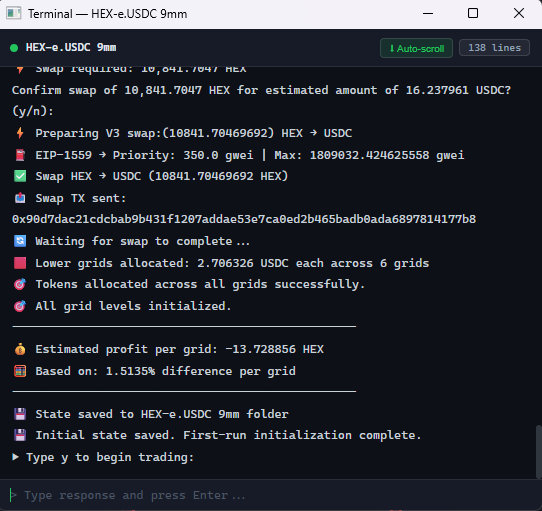
Final confirmation — begin trading
Everything is set up, saved, and approved. Answer y and press Enter. Your bot is now live and
trading.
8. Terminals & Live Monitoring
Each bot has its own dedicated terminal that buffers the last 500 lines of output.
- The status dot is green when running, grey when stopped — updates in real time.
- The Auto-scroll button keeps the terminal pinned to the latest output. Toggle it off if you want to scroll back through history.
- ANSI color codes from the bot process are stripped automatically for clean, readable output.
- The input field is always available — you can type answers at any point the bot asks a question mid-run.
- Opening a pop-out on an already-running bot immediately shows you the buffered log history — you do not miss anything.
9. Understanding Your Stats — ROI, APY
The numbers on each bot card are calculated from calculationlog.txt and profit.txt.
Here is exactly what each one means:
The USD value of all funds when the bot was first started, calculated from the first Start
block in the calculation log. Written once and never changed — except when a compound occurs, at which point
the newly added funds are added to the baseline.
The real-time USD value of all Token A and Token B currently held across the grids, calculated using the live on-chain price fetched directly from LP reserves via the blockchain.
Current Value minus Initial Balance. Your unrealized gain or loss — the difference between what you put in and what the bot currently holds. Does not include profits already sent to your Profit Wallet.
The total Token A sent to your Profit Wallet over the entire lifetime of this bot, expressed as a percentage of initial balance. This is your realized return — money that has actually left the bot and reached your wallet.
The Lifetime ROI annualized based on actual runtime. If the bot has been live for 30 days and achieved 5% ROI, the APY would be approximately 61% compounded annually. This is the most meaningful long-term performance indicator.
Based only on profit distributions in the last 24 hours, projected to a full year. This reflects very recent performance and can fluctuate significantly. A quiet market day shows a lower number; an active day shows higher. Use Performance APY for the true picture.
⚠️ All USD calculations require profit.txt to have a valid STABLECOIN address set. If this is not configured, the UI will show $0 or incorrect values. See Section 11.
10. Profit Charts Window
Click the Charts button on any bot card to open a dedicated profit visualization window. It reads
actionslog.txt and plots every profit distribution event over time.
- Stat cards — total tokens sent to profit wallet, total kept for compounding, combined total, and number of profit events.
- Chart 1 — Cumulative Realized ROI — a staircase line showing the running total of tokens sent to your Profit Wallet. Each step is one profit distribution.
- Chart 2 — Profit Allocation Over Time — a stacked area chart showing the split between sent (realized) and kept (compounding) profit over the bot's lifetime.
- Zoom controls — scroll zoom or box zoom to inspect specific time periods. Both charts zoom and pan in sync.
- Tooltips — hover any data point to see the exact date, time, cumulative amount, and the delta for that single event.
- The window auto-refreshes every 5 minutes, or click Refresh manually.
11. The profit.txt File — Setting Up USD Calculations
Every bot instance has a profit.txt file that drives all USD value calculations. When a bot is
created, this file is pre-populated with a placeholder you must update before USD numbers will be accurate.
Open it via the bot card's Logs & Files tab → Profits Log. You will see:
{
  "STABLECOIN": "ENTER_A_STABLE_COIN_ADDRESS_HERE",
  ...
}
Replace ENTER_A_STABLE_COIN_ADDRESS_HERE with the contract address of the stablecoin in your
trading pair — whichever of Token A or Token B is the stablecoin. For example, if trading WBTC-USDC
, paste the USDC contract address into that field and save the file.
If neither token in your pair is a stablecoin, USD calculations will be instead in the Token B Price. The bot will still trade correctly — this only affects the dollar display values in the UI.
12. How the Grid Trading Logic Works
The Grid
On first run, the bot divides your Low-to-High price range into evenly spaced levels. Each level is assigned a fixed amount of Token A. The current market price determines which levels are "upper" (holding Token B, waiting to sell) and which are "lower" (holding Token A, waiting to buy on a price drop).
A Trade Cycle
When the price rises from one grid level to the next, the bot sells Token A for Token B at that level, capturing the price difference as profit. When the price drops back to a lower level, the bot buys Token A back with Token B. This buy-low/sell-high cycle repeating across many levels over time is how profit accumulates.
Profit Capture
Profit is realized when Token B is converted back to Token A at a higher price than it was originally acquired. The excess Token A above what the grid requires accumulates as unallocated profit until the compound threshold is reached.
Price Range Behavior
- If price rises above your High Price, all Token A has been sold. The bot holds only Token B and waits for price to fall back into range.
- If price drops below your Low Price, all Token B has been spent buying Token A. The bot holds only Token A and waits for price to rise back into range.
- Neither situation is a realized loss — the bot is fully positioned at the extreme and resumes trading when price re-enters the range.
V2 vs V3
- V2: Uses getAmountsOut router calls and reserve-based pricing. Simpler and more broadly compatible.
- V3: Uses slot0 sqrtPriceX96 math for pricing and exactInputSingle/exactOutputSingle for swaps. More gas efficient but requires precise wrapped gas token configuration.
13. Gas & The Backup Wallet System
Every on-chain transaction costs gas. The bot manages gas automatically so you do not need to manually top up the trading wallet during normal operation.
The trading wallet (Private Key Grid) holds gas for immediate use. The backup wallet (Private Key 2) acts as a reservoir. When the trading wallet's gas drops to the Top-Up Trigger level, the bot requests a transfer of the Top-Up Amount from the backup wallet automatically.
- Keep a healthy gas balance in the Backup Wallet at all times. If it empties, the trading wallet will eventually stall and stop executing trades.
- The Low Gas Token Balance Warning is the hard floor — if the trading wallet hits this level before a top-up arrives, trading pauses until gas is restored.
- On chains with gas spikes (Ethereum, Polygon during high activity), set your thresholds generously to avoid pauses during volatile periods.
14. Compounding & Profit Distribution
Profit Distribution
When excess Token A reaches the distribution threshold, the bot splits it according to your Profit That Bot Keeps % setting. The "sent" portion transfers directly to your Profit Wallet. The "kept" portion stays in the bot for compounding. Both events are timestamped in the Actions Log and appear in the Charts window.
Compounding
The kept portion accumulates until it reaches your Amount to Trigger Compound setting. At that point, the bot redistributes it back into the active grids — increasing the value of each grid level proportionally. After a compound, the Initial Balance is updated upward to reflect the new funds added, so calculations remain accurate going forward.
15. Instance Files — What Each File Does
Each bot instance lives in its own folder inside the instances directory. Inside each folder:
Your private keys and RPC URL. The most sensitive file in the entire application. Never share it, never commit it to version control, never send it to anyone. If this file is compromised, your wallets are compromised.
All configuration values — price range, grid count, token addresses, gas settings, profit settings. The bot reads this on every start.
The full saved state of the grid — every level, the Token A and Token B balance at each level, and the
current position. This is what the bot loads when you answer y to the "load saved state"
question. Do not edit while the bot is running.
A timestamped plain-text record of every meaningful event: bot start/stop, every trade, every profit distribution, every compound. The best file to review when you want to understand what the bot has been doing. Also what the Charts window reads to build profit graphs.
Records errors during trading — failed transactions, RPC timeouts, unexpected responses. Check this first if the bot appears to have stopped trading unexpectedly.
Detailed balance snapshots at Start, Updated (compound), and Distro events. Records Token A and Token B balances plus price at each event. This is what the UI reads to calculate ROI, and APY.
Stores the running USD value calculations — initial investment, current value, unrealized profit, and the stablecoin address used for conversion. The UI reads this to show dollar amounts on the bot card. See Section 11 for setup.
A simple file recording whether the bot is RUNNING or STOPPED. The UI reads this to show the correct status on the bot card.
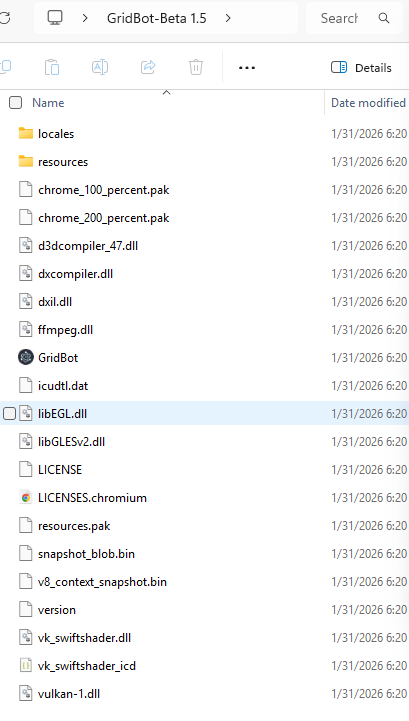
Navigating to instance files manually
If you need to access files outside the UI, open the application folder and go into resources.
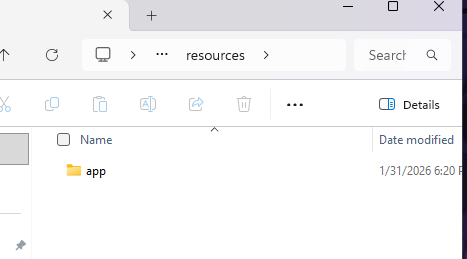
Then into the app folder.
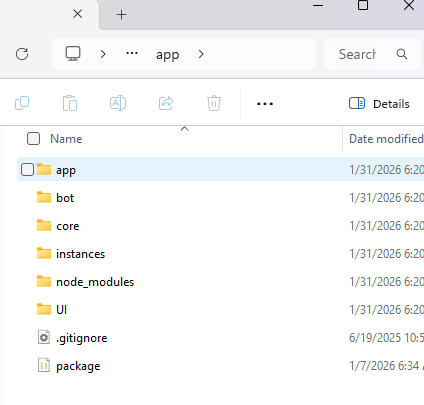
Then into the instances folder.
You will see one subfolder per bot, named exactly as you named it when you created it.
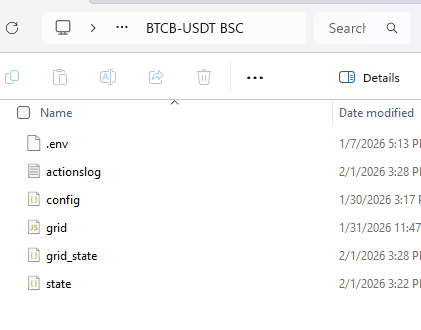
Inside an instance folder
All the files described above are here. Open any in Notepad or any text editor to inspect them.
⚠️ Never edit these files while the bot is running. The bot reads and writes them continuously. Editing mid-run can corrupt the grid state and cause incorrect trades.
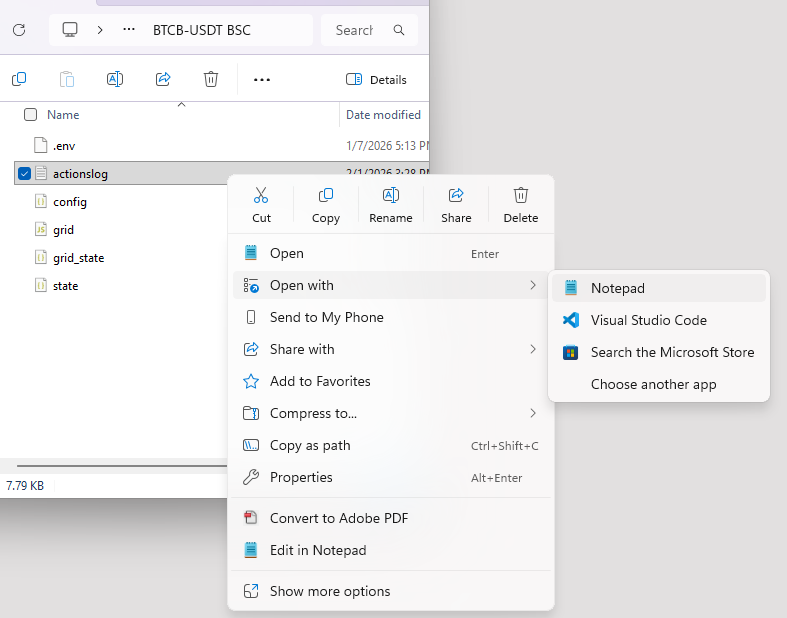
Opening the actionslog
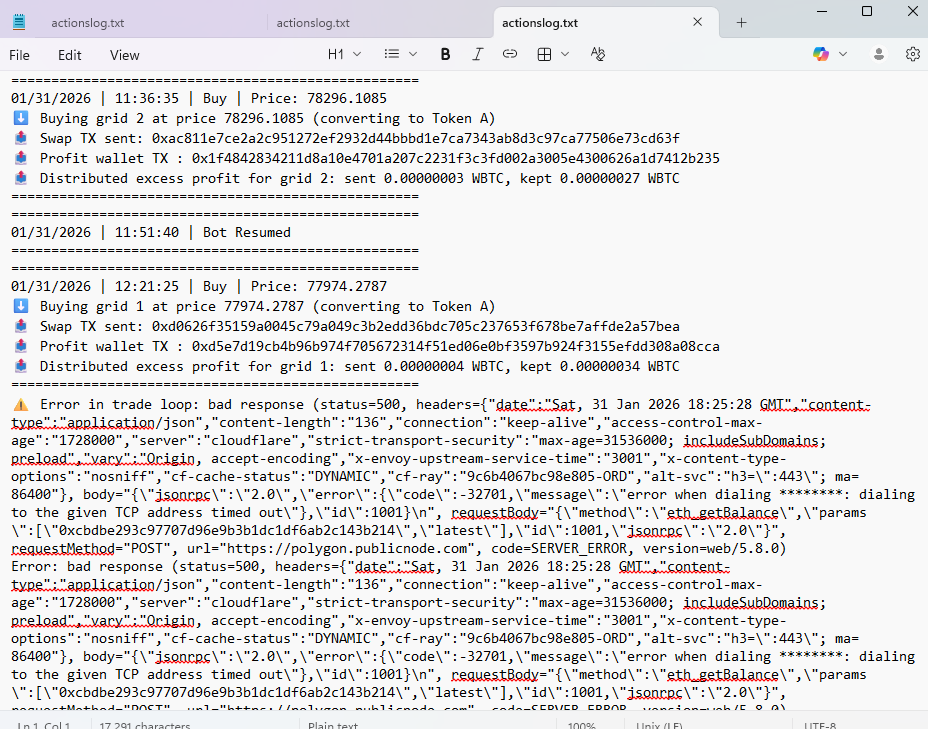
Right-click actionslog.txt and open with Notepad to read the full timestamped trading history.
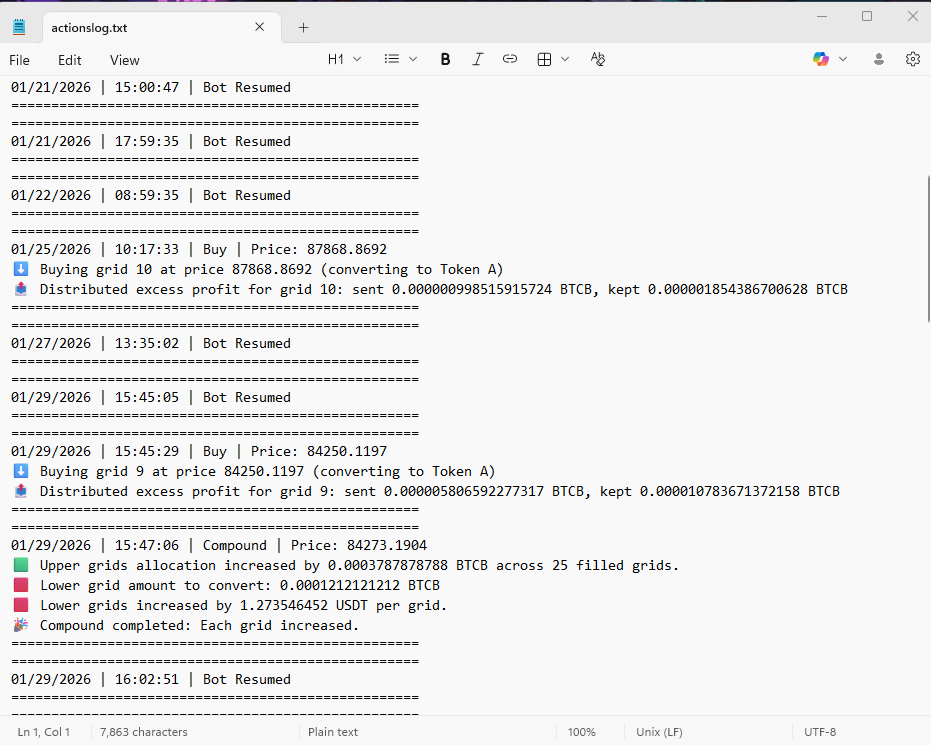
Reading the actionslog
Each entry shows exactly what the bot did — trades, profit distributions, compounds, and start/stop events. This is the fastest way to review activity without scrolling through terminal output.
Spotting errors
Errors appear in the actionslog alongside normal trading activity so you can see them in context. The errorslog.txt provides more detailed error output when needed.
16. Common Errors & Fixes
| Problem | Cause & Fix |
| Bot prints "License check failed" and refuses to start. | The Private Key 2 wallet does not match the registered license, or the license has expired. Verify your license is active at the License UI and that Private Key 2 in this bot's .env is the correct licensed wallet. |
| Bot hangs for a long time on the license check. | The license validation server is not responding — usually a temporary network issue. Stop the bot, wait a few seconds, and restart. |
| UI is frozen and not responding to clicks. | Electron focus issue. Click anywhere outside the app window, then click back on the UI. It restores responsiveness immediately. |
| Token approval transactions keep failing. | Almost always an RPC issue. Stop the bot, switch to a different RPC endpoint in the config, then restart. |
| Bot is running but not making any trades. | Likely causes: (1) market price is outside your Low/High range — no active grids to trigger; (2) volatility is too low and price is not crossing grid boundaries; (3) Min Spacing % is set too high relative to current price movement; (4) gas is being rejected due to hitting the max Gwei limit. Check the terminal and errorslog for specifics. |
| Transactions fail with insufficient gas errors. | The trading wallet's gas has run out and the top-up from Private Key 2 has not arrived, or Private Key 2 is also empty. Manually send gas to the trading wallet and check the Backup Wallet balance. |
| USD values show $0 or obviously wrong numbers. | The STABLECOIN field in profit.txt has not been set or is set to the wrong address. Open it via the Profits Log button and update the STABLECOIN address to match the stablecoin in your trading pair. See Section 11. |
| Bot shows wrong price or trades at unexpected levels. | The LP Pair Address is likely pointing to the wrong pool. Verify on Dexscreener — confirm it is the correct V2 or V3 pool for your exact token pair on the correct chain and DEX. |
| Grid state appears corrupted after an unexpected shutdown. | If the bot was force-killed or the system crashed mid-write, grid_state.json may be partially written. Open it in Notepad and check that the JSON is complete and valid. If corrupted, reach out via Telegram before attempting a manual fix. |
17. Safety Rules & Best Practices
- One trading wallet per chain per bot. Never share a Private Key Grid wallet between two bots on the same chain — balance conflicts cause incorrect trades.
- Never run with funds you cannot afford to lose. Grid trading carries real risk. A sharp sustained move outside your range results in a heavily one-sided position.
- Start small. On a new pair or chain, start with a small amount to verify everything works correctly before committing larger funds.
- Check the actionslog daily. Regular log review is the fastest way to catch issues early — unexpected stops, error patterns, or trades that look wrong.
- Keep the Backup Wallet funded. The gas top-up system only works if Private Key 2 has gas. Check it regularly, especially on high-activity chains.
- Never share your .env files. Anyone with your private keys has full, unrecoverable access to your wallets.
- Stop the bot before editing any instance files. The bot reads and writes these files continuously. Editing mid-run risks corruption.
- Use reliable RPCs. Public RPCs can be rate-limited under load. For serious use, consider a paid private RPC from Alchemy, QuickNode, or similar.
- Keep the app updated. New versions contain bug fixes and improvements. Always download from the official releases page.
18. Disclaimer
This software is provided as-is, without warranty of any kind. You are solely responsible for your configuration, your private key security, all trades executed by the bot, and any financial gains or losses that result. Grid trading involves real financial risk. Past performance does not guarantee future results. Always do your own research before deploying funds.